
What is the purpose of an angle bead?
What is the purpose of an angle bead?
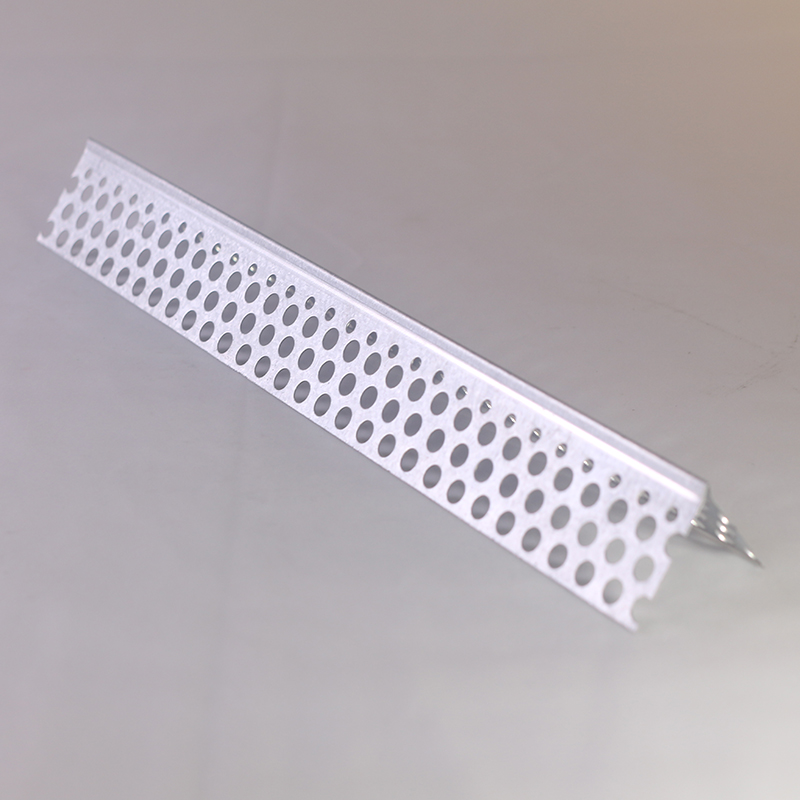
A specialty building material used in construction, especially in the installation of drywall, is an angle bead, also called a corner bead. Its main function is to strengthen and shield the outside corners of walls, which are susceptible to deterioration from impacts and normal wear and tear.
Before drywall taping and finishing, drywall corner beads are usually placed in the corners of walls. They can be composed of paper, plastic, or metal. In order to apply joint compound or plaster, they offer a sturdy, straight edge that keeps edges sharp. Angle beads also improve the overall structural integrity and visual appeal of the finished wall surface by preventing chips and cracks in the corners of walls.
How do you stick angle beads?
To adhere angle beads, take the following general actions:
Get the Surface Ready: Make sure the wall's corners are dust- and debris-free, dry, and clean. This will aid in the correct adhesion of the angle bead.
Calculate and Slice: The length of the corner where the angle bead will be installed should be measured. Cut the angle bead to the proper length with a hacksaw or tin snips. Verify that the cut is accurate and straight.
Put Adhesive on: Before installing the angle bead, apply a small layer of joint compound or construction glue along the corner. Ensure that the glue is applied uniformly.
Place the Angle Bead: Make sure the angle bead is properly oriented and makes good contact with the adhesive by pressing it firmly into place along the corner. Make sure the angle bead is vertically straight by using a level.
Secure in Place: You can use screws, nails, or specialty fasteners made specifically for angle beads to make sure the bead stays in place while the adhesive dries. Make sure these are flat with the surface as you hammer or screw them into the wall through the angle bead's perforations.
Fill and Finish: After the angle bead is firmly in position, you can cover it with plaster or joint compound to seal any seams or gaps. Using a putty knife or drywall knife, smooth down the compound or plaster to provide a smooth corner.
Sand and Paint: Lightly sand the surface to eliminate any flaws after the joint compound or plaster has fully dried. The wall can now be painted any color you choose.
For precise installation instructions, always consult the manufacturer's instructions; methods may differ according on the kind of angle bead and the surface material.
What is the purpose of an angle bead?
A specialty building material used in construction, especially in the installation of drywall, is an angle bead, also called a corner bead. Its main function is to strengthen and shield the outside corners of walls, which are susceptible to deterioration from impacts and normal wear and tear.
Before drywall taping and finishing, drywall corner beads are usually placed in the corners of walls. They can be composed of paper, plastic, or metal. In order to apply joint compound or plaster, they offer a sturdy, straight edge that keeps edges sharp. Angle beads also improve the overall structural integrity and visual appeal of the finished wall surface by preventing chips and cracks in the corners of walls.
How do you stick angle beads?
To adhere angle beads, take the following general actions:
Get the Surface Ready: Make sure the wall's corners are dust- and debris-free, dry, and clean. This will aid in the correct adhesion of the angle bead.
Calculate and Slice: The length of the corner where the angle bead will be installed should be measured. Cut the angle bead to the proper length with a hacksaw or tin snips. Verify that the cut is accurate and straight.
Put Adhesive on: Before installing the angle bead, apply a small layer of joint compound or construction glue along the corner. Ensure that the glue is applied uniformly.
Place the Angle Bead: Make sure the angle bead is properly oriented and makes good contact with the adhesive by pressing it firmly into place along the corner. Make sure the angle bead is vertically straight by using a level.
Secure in Place: You can use screws, nails, or specialty fasteners made specifically for angle beads to make sure the bead stays in place while the adhesive dries. Make sure these are flat with the surface as you hammer or screw them into the wall through the angle bead's perforations.
Fill and Finish: After the angle bead is firmly in position, you can cover it with plaster or joint compound to seal any seams or gaps. Using a putty knife or drywall knife, smooth down the compound or plaster to provide a smooth corner.
Sand and Paint: Lightly sand the surface to eliminate any flaws after the joint compound or plaster has fully dried. The wall can now be painted any color you choose.
For precise installation instructions, always consult the manufacturer's instructions; methods may differ according on the kind of angle bead and the surface material.
Let’s grow together.We have advanced production equipment,leading production techniques,and strictly quality control.And We manufacture products from high-quality steel coils,products,and sales service make as your one-stop decoration construction supply shop.Hopestar Building is the senior steel manufacturer,the factory has more than 50 sets of production lines for galvanized steel profiles,T grid,and Accessories.The annual product quantity is 20,000 Tons.The factory has developed business with South America,Europe,Africa,and Oceania.we supply and have a commitment to making customers’projects a reality.
How should angle beads be stored?
What is furring used for?
Related Article



